 I recently had a recent discussion forum conversation with some of my instructional design students about whether or not to include the instructor in an instructional video. Personally, I believe that doing so increases Teacher Presence, thus promoting the other presences in a Community of Inquiry (Athabasca University, n.d.). It reassures students that the instructor is present, and paying attention to their progress, even in a distributed learning context. Also, while many users may overtly ignore the on-screen instructor (especially when projected in a smaller window in front of a screencast type recording), they can still subconsciously pick up cues from the instructor's body language that can aid in engagement and overall learning. 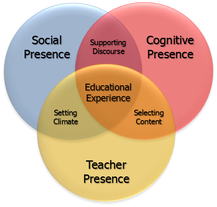 Figure 1: The Community of Inquiry Model (Athabasca University, n.d.) An interesting article from 2021 just came across my Twitter feed. Henderson and Schroeder's (2021) A Sytematic review of instructor presence in instructional videos highlights many of the reasons to include an on-screen instructor in an instructional video that I just mentioned, which they found as part of their systematic literature review of the impacts of on-screen instructors. However, their actual findings are quite interesting. The authors include the following highlights with the paper's Abstract: - We reviewed the literature around the use of on-screen instructors in video. Essentially, there is no definitive answer as to whether the presence of an on-screen instructor actually increases engagement and learning! That's because of inconsistent findings across the literature reviewed. But -- and this is an important "but" -- there is also no evidence to indicate that it is detrimental to include the instructor in the video! The authors call for more research (using a consistent, systematic approach) to determine the actual impact level of instructor on-screen presence, and to offer sound guidance on when to include it, and when it is best not to. In light of this, I find myself "sticking to my guns" on this issue. Even if there are inconsistent findings on the pedagogical benefits of including an instructor on-screen in an instructional video, I do believe that this little bit of extra presence contributes to the bigger picture when promoting engagement, and maximizing the benefits of promoting a Community of Inquiry in our courses! Related ResourcesPower, R. (2020, September 3). Maximizing the Impact of Instructional Video Length. [Web log post]. Power Learning Solutions. https://www.powerlearningsolutions.com/blog/maximizing-the-impact-of-instructional-video-length Power, R. (2020, April 17). Creating a YouTube Channel for Educators. [YouTube video]. https://youtu.be/Uy_5gOV80LY Power, R. (2019, January 14). Using YouTube to Share Video in an Online Course. [Web log post]. Power Learning Solutions. https://www.powerlearningsolutions.com/blog/using-youtube-to-share-video-in-an-online-course Power, R. (2019, January 22). Adding a Human Touch to Online Learning, Right From the Start! [Web log post]. Power Learning Solutions. https://www.powerlearningsolutions.com/blog/adding-a-human-touch-to-online-learning-right-from-the-start ReferencesAthabasca University (n.d.). CoI Framework. https://coi.athabascau.ca/coi-model/
Henderson, M., & Schroeder, N. (2021). A Systematic review of instructor presence in instructional videos: Effects on learning and affect. Computers and Education Open, 2(2021) 100059. https://doi.org/10.1016/j.caeo.2021.100059
0 Comments
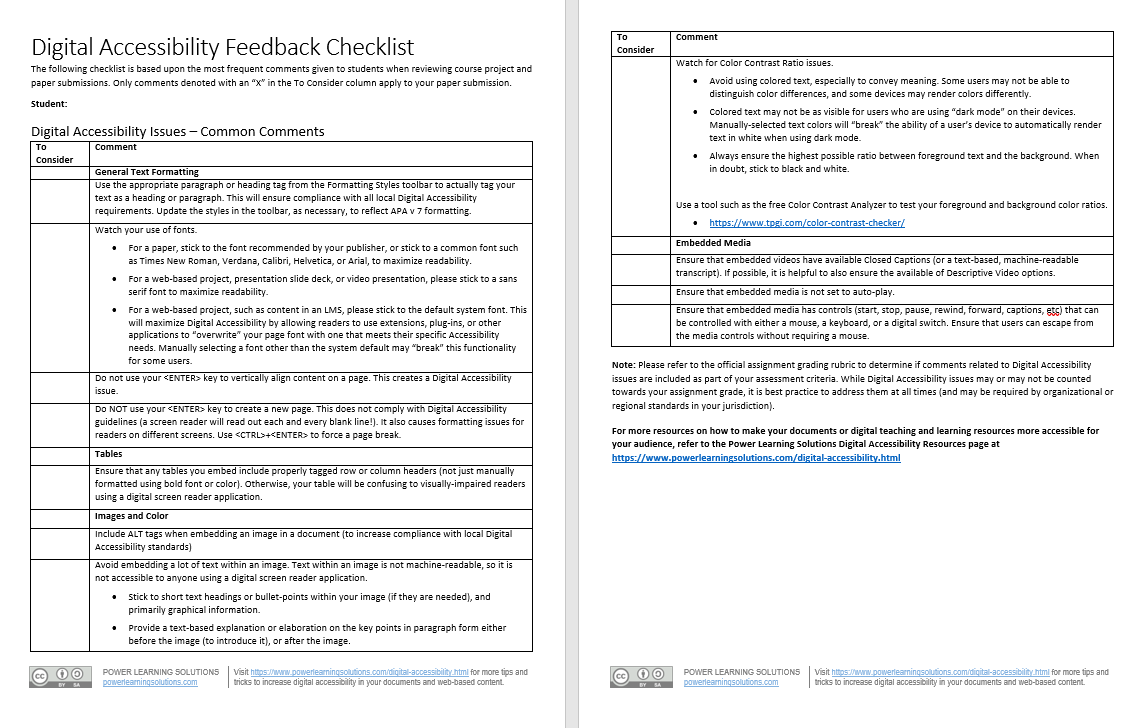
 You may have noticed something different about the Power Learning Solutions website! It's been a while since I rebranded the site from an ePortfolio, and even longer since I originally launched the site. I figured that it was time I freshened up my site theme to give it a more modern look-and-feel. More importantly, I want to make sure that I "practice what I preach" when it comes to general web design, user experience, and (perhaps most importantly) compliance with WCAG 2.1 Digital Accessibility standards. I know there's probably some legacy content on this site that might cause some aesthetic and accessibility issues... but hopefully the new site design is a step in the right direction. And, hopefully, you like it! 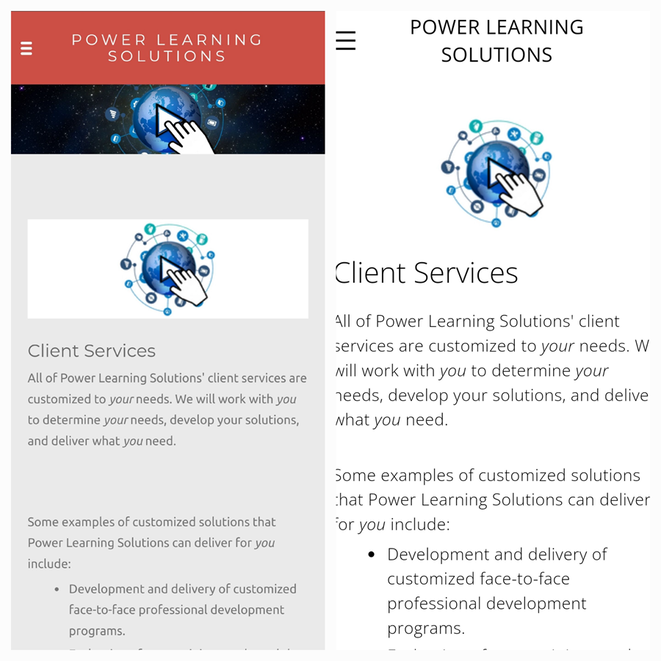 Screenshots of the old a new Power Learning Solutions site design (mobile view) Update (Feb 19, 2024): Updated versions of the Document Formatting Checklist and Digital Accessibility Checklist have been uploaded, included updated links for existing comments, and a new comment regarding the use of textboxes and Digital Accessibility compliance. I recently posted a video about how I use the mail merge features of Microsoft Excel and Word to automate my feedback to students about common APA paper formatting issues. I routinely include a checklist of common APA formatting issues when providing feedback on student paper submissions, checking off the items that each student seems to be struggling with. Over the past few terms, I have started embedding issues into my checklist related to Digital Accessibility concerns noted in students' papers and projects. Whether or not these issues are included in students' grades, it is important to highlight them to help promote awareness (and hopefully inspire a more Digital Accessibility-conscious practice mindset). I am constantly tweaking my checklist, and recent conversations with a colleague and with some of my students inspired me to do a broader-scale overhaul. In my latest version, I have separated out and expanded the Digital Accessibility comments. I also decided to post two versions of the updated checklist here for anyone who wants to integrate them into their feedback routine. One version is my full checklist, which include common APA version 7 formatting comments as well as Digital Accessibility issues. The second version, which might be useful for assignments and projects other than APA format student papers, includes just the Digital Accessibility issues. Both are available in Word and PDF format, and the Word versions are available with and without the embedded Excel mail merge fields (I have also included an Excel template with the merge fields). The APA Fomatting Checklist covers:
The Digital Accessibility Feedback Checklist covers:
I created the following video a while back. It provides a good overview of how to use the Excel file and merged Word document to automate the process of providing feedback with the templates for your students. Additional ResourcesCheck out the Power Learning Solutions Digital Accessibility Resources page for more tips and tricks to increase digital accessibility in your documents and web-based content.

As many post-secondary institutions prepare to return to in-person classes following the switch to remote teaching during the COVID-19 pandemic, we're all wondering how we can effectively return to classroom teaching with social distancing practices in place. If there's one thing that we've learned from the shift to online teaching and learning, it's that there are a number of digital tools that we can use to share resources and maximize student engagement during virtual classes. Well, the good news is that many of those tools and approaches can also be leveraged in the classroom.
In preparation for a return to in-person classes at Cape Breton University, my colleagues and I took some time to visit one of our campus' large lecture theatres to record some demonstrations of how we can leverage digital tools, including Microsoft Teams, to engage with our students safely and effectively. The following are a series of videos that I edited from that demonstration session. In these videos, we cover how to:
Additional Resources
Resources Referenced in Demonstrations
Microsoft Teams
Access the complete video library of Microsoft Teams Tips and Tricks for Educators at https://youtube.com/playlist?list=PLIJ8QfsveW2Zp0ksxQAoBMqZkRvTyF1pa
Moodle
Access the complete library of Moodle Tips and Tricks for Educators at https://youtube.com/playlist?list=PLIJ8QfsveW2Zbm4pm-W6rtdI_vj4gnDMM Finding the Right Digital Tool is Not Enough: Addressing Copyright and Privacy Considerations2/26/2021  In my instructional design and educational technology integration courses, my students frequently develop plans for the integration of digital resources to help resolve instructional design problems, or to better achieve learning goals and objectives. I often recommend the use of Bates's SECTIONS tool (Bates, 2019; Underhill, 2010) for evaluating the suitability of a digital resource to meet learning needs, and the context in which the learning is taking place. But, finding the right tool is not enough! I try to impress upon my students the importance of taking into account, in advance, potential copyright considerations and privacy and access to information issues. No teacher or student wants to get into trouble for violating copyright restrictions. And, many jurisdictions (schools, school boards or districts, local government departments) now have relevant privacy and access to information policies. By addressing these considerations up front -- or at least identifying which ones need to be addressed -- we can avoid getting into a situation where an otherwise well-designed lesson or unit plan ends up "dead in the water" because we simply are not allowed to proceed as planned. In response to inquiries from some of my students, I have created this relatively basic template that you can use to keep track of the digital resources that you plan to use, how to give them proper credit, and what issues you, or a fellow educator, need to address before implementing your lesson or unit plan. ETICPCThe Educational Technology Integration Copyright and Privacy Considerations Template Downloadable Versions:
ReferencesBates, A. (2019). Choosing and using media in education: The SECTIONS model. In Teaching in a Digital Age – Second Edition. Tony Bates Associates Ltd. https://pressbooks.bccampus.ca/teachinginadigitalagev2/part/9-pedagogical-differences-between-media/
Underhill, C. (2010). Assessing Technology Using the SECTIONS Model. [PDF file]. University of British Columbia, Centre for Teaching, Learning and Technology. https://wiki.ubc.ca/images/1/19/SECTIONS_Framework.pdf  I typically include some form of group collaboration in the design of my online courses -- whether it be breakout activities during live class meetings, group presentations, or problem-based group projects. Every term, I invariably get some complaints from students, typically along the lines of:
So -- If I get these types of complaints, why do I assign group activities? And why do I sometimes limit some of the choices that students have about which groups, topics, or group members they work with? (To be clear -- I frequently do give them time to sign-up for a group / topic of their preference -- but after a deadline I often need to assign students to a group, especially students who enroll late in a course.) One reason that I assign group activities is to help foster the development of a full Community of Inquiry in my online courses. Working with others helps to build Social Presence. Combined with my instructional design decisions, guidance, and feedback (Teacher Presence), this helps to maximize everyone's sense of belonging, and their Cognitive Presence in a course.  The Community of Inquiry Framework (Adapted from Athabasca University, 2016) Another reason that I assign group activities is because that is the way the world works outside of school. It is very likely that we will all -- at some point or another -- work as part of a team. Many times, the ability to work effectively within a team is written right into the descriptions of jobs we will be applying for! So, group work in online courses is good practice for "the real world." Now -- when we are working as part of team in "the real world," we are expected to work collaboratively towards a common goal. This is different from working cooperatively. Working cooperatively means that we may share a common goal, but we are simply "getting along" with each other and working together nicely. Working collaboratively means that we pool our expertise, resources, and efforts, to achieve that common goal. It does NOT mean that we all do exactly the same thing -- and sometimes some of us may feel like we are doing more than others on the team. And, let's face it -- sometimes we are! Sometimes, some team members do not contribute as fully as they could or should.
On the face of it, this sounds like a valid complaint. But, when we are talking about working as part of a team, it is actually a very individualistic (dare I say "self-centered" in the literal sense of the term -- not in a condescending way) perspective. In a team context, it is the team goals that matter, not individual goals. Don't get me wrong -- I'm not saying that we should let others "take advantage" of us, and create a life of stress for us as individuals. What I'm saying is that in group assignments -- just like team contexts in work environments -- we need to focus on achieving the immediate team goal. Sometimes, focusing on the team goal does mean that we end up doing more than what we feel is our fair share. But, our priority is the success of the team as a whole. We don't always know why some individuals are not contributing as fully as we would like them too -- and sometimes a "poor" performance on one team project can still be a valuable learning experience for the underperformer. They may still learn from the rest of the group (think of the Zone of Proximal Development), and be a much better "team player" the next time around. 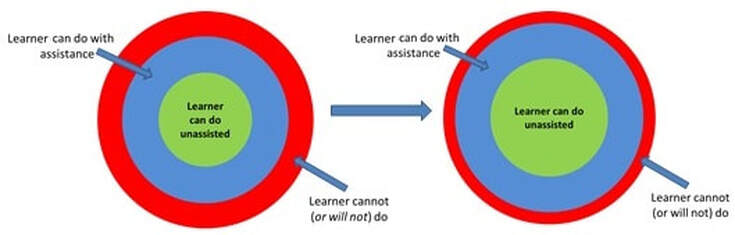 Increasing learning potential in Vygotsky's zone of proximal development (adapted from Engström, 1987) Increasing learning potential in Vygotsky's zone of proximal development (adapted from Engström, 1987) Or, they may not. It doesn't really matter that they get the same grade as you on one course assignment, or that they get acknowledged as part of the team at work. They know how much they contributed, as do other team members. While they may be "riding your coat tails" this time around, their performance and whether or not they improve as a team player over time will get noticed where and when it counts. It may not impact their current grade in a course -- but it will impact their ability to get favors from group members or coworkers, the ability to advance within the team environment, and possibly even their overall careers (if no one is willing to give them a good work reference!). I know that this sounds a bit corny -- but, if you're worried about your personal preferences or grades suffering because you've been assigned to work with a group -- focus on those team goals, on what's best for everyone in the team, on being a good collaborator and team leader -- and "take one for the team!" ReferencesEngström, Y. (1987). Learning by expanding: An activity-theoretical approach to developmental research. [Web page]. http://lchc.ucsd.edu/MCA/Paper/Engestrom/expanding/toc.htm
Garrison, D. R., Anderson, T., & Archer, W. (2000). Critical inquiry in a text-based environment: Computer conferencing in higher education model. The Internet and Higher Education, 2(2-3), 87-105. http://cde.athabascau.ca/coi_site/documents/Garrison_Anderson_Archer_Critical_Inquiry_model.pdf  With the recent surge in blended on wholly online teaching and and learning scenarios, there has been an uptick in interest in best practices for the creation of video-based instructional content. Here are a few resources discussing elements of effective instructional video creation -- particularly the optimal length for an instructional video. While YouTube statistics show that the top 10 videos on that platform are about 3 minutes long (Baker, 2018), Brame (2015) notes of research in an educational video context that: the median engagement time for videos less than six minutes long was close to 100%–that is, students tended to watch the whole video (although there are significant outliers; see the paper for more complete information). As videos lengthened, however, student engagement dropped off, such that the median engagement time with 9-12 minute videos was ~50% and the median engagement time with 12-40 minute videos was ~20%. In fact, the maximum median engagement time for a video of any length was six minutes. Brame (2015) sums it up nicely, stating that "[m]aking videos longer than 6-9 minutes is therefore likely to be wasted effort." Long story short:
The following resources are fairly short reads, and are worth checking out. Baker, A. (2018, December 4). Optimal YouTube Video Length. [Web log post]. Content Creator. https://contentcareer.com/blog/optimal-youtube-video-length/ Bhattacharya, P. (2020). Why Your Ideal Online Course Video Must Be 6-12 Minutes Long. [Web log post]. HubSkills.com. https://hubskills.com/online-course-video-to-be-6-12-minutes/#gs.elum6y Brame, C.J. (2015). Effective educational videos. [Web page]. Center for Teaching. http://cft.vanderbilt.edu/guides-sub-pages/effective-educational-videos/ Burch, B. (2020). Video Length in Online Courses: What the Research Says. [Web log post]. Quality Matters. https://www.qualitymatters.org/qa-resources/resource-center/articles-resources/research-video-length Guo, P. (2013, November 13). Optimal Video Length for Student Engagement. [Web log post]. EdX. https://blog.edx.org/optimal-video-length-student-engagement/ Related ResourcesPower, R. (2020, February 13). Helping Everyone Access Your Online Learning Resources. [Web log post]. Power Learning Solutions. https://www.powerlearningsolutions.com/blog/helping-everyone-access-your-online-learning-resources
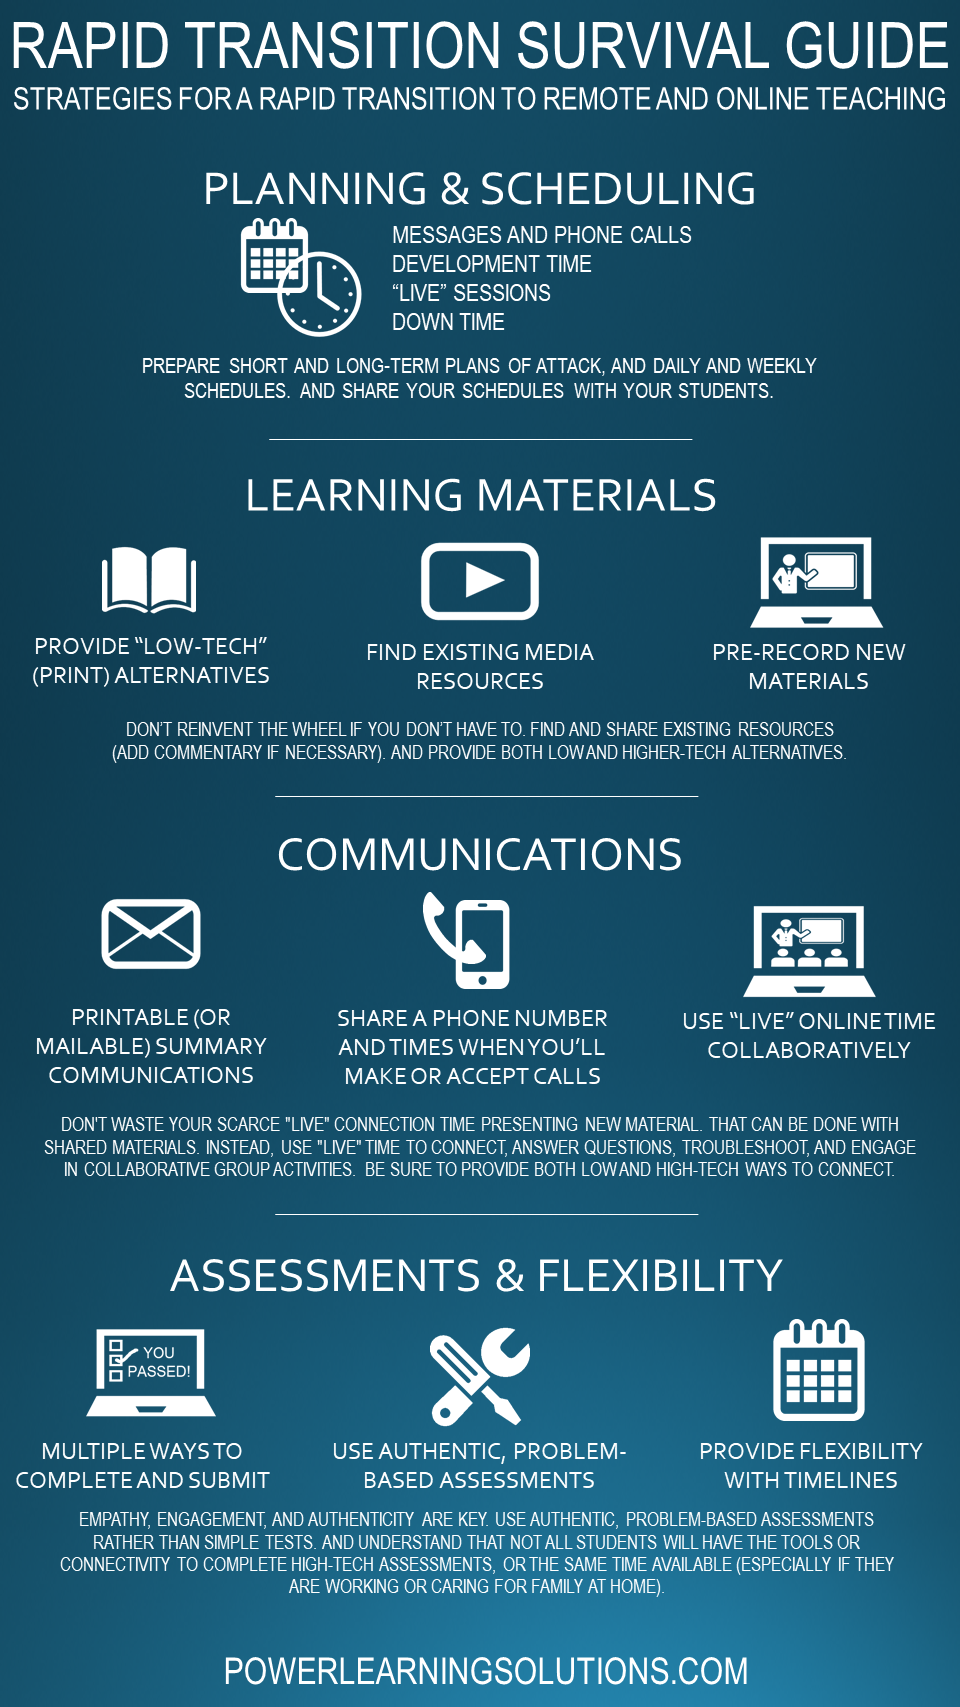
Power, R. (2020, March 6). Using Video to Provide Assignment Feedback. [Web log post]. Power Learning Solutions. https://www.powerlearningsolutions.com/blog/using-video-to-provide-assignment-feedback Power, R. (2020, April 17). Creating a YouTube Channel for Educators. [YouTube video]. https://youtu.be/Uy_5gOV80LY Power, R. (2019, January 14). Using YouTube to Share Video in an Online Course. [Web log post]. Power Learning Solutions. https://www.powerlearningsolutions.com/blog/using-youtube-to-share-video-in-an-online-course Power, R. (2019, January 22). Adding a Human Touch to Online Learning, Right From the Start! [Web log post]. Power Learning Solutions. https://www.powerlearningsolutions.com/blog/adding-a-human-touch-to-online-learning-right-from-the-start Update (April 8, 2020): This post has been updated with a new Rapid Transition Survival Guide infographic. In recent days, there have been numerous announcements of plans by governments and institutions to shift their face-to-face (F2F) courses to online delivery. The aim is to implement social isolation practices, in order to mitigate the impacts of the COVID-19 pandemic. For many (if not most) instructors and students, this will be their first foray into the world of online teaching and learning -- and that can be quite scary. I develop courses for online learning, and I teach instructional design for online learning. I can tell you with no uncertainty that simply dumping your lecture notes and resources into an online portal is not effective. I can also tell you that it takes time, expertise, and resources, to develop and deliver optimal online courses. However, I realize that under current circumstances, these conditions cannot be met by the majority of instructors faced with rapidly moving their courses online. I'm sharing this guide to do two things:
First Things First I'm not going to dive into seminal works, or the key theories that inform effective instructional design for online learning. I'm going to focus on practical strategies to get your students and your course online as quickly as possible, using tools that anyone can access and become comfortable using, while avoiding things that could lead to a disastrous experience. The first thing to do as an instructor is to develop a "plan of attack." You do not want to spend the rest of this term, or an entire upcoming term, panicking about how you are going to manage this transition. You need a plan that you can focus on day-to-day, and week-to-week. Communications. Set aside time at the beginning and the end of each work day for reading and responding to emails, student inquiries, and discussion posts. It can be quite easy to eat up your entire day with these things if you don't schedule yourself! Development. Schedule some "development" time for each work day, which you will use for preparing materials to share through your online channels. Keeping Ahead. Stay at least one week ahead of your students. You should be using your "development" time to prepare the resources and activities that you will need for next week, while responding to students as they work through this week's activities. Consistency. Use a consistent format for preparing and sharing your resources and activities each week. This will help you to manage your development activities, and it will help students to navigate them once they are posted. Time Off. Set aside time for yourself, and your family. Let your students know what your working hours are, and avoid "routine" work on the weekends. (I still check in at least once a day, just to see if there are any fires to put out, or any students who have urgent needs... even if just to send them a quick note to let then know when I will get back to them in detail.) What to Develop, and How to Share itFor most of us, we are going to need to handle three main things in a rapid transition to online learning:
Moving Live Classes to a Virtual Space Some institutions already have virtual classroom environments, such as Adobe Connect, Blackboard Collaborate, or even Zoom. If you are mandated to use these resources to host live (synchronous) class sessions, I strongly advise against simply lecturing to a camera for a full hour (or two hours, or three...). This can be difficult for you (to prepare enough material, and to not feel awkward). Instead, use this time to host class discussions, and to get students working on collaborative activities based on the current week's materials. In essence... flip your class. Lecture CaptureUsing your live class time to lecture is a waste of your opportunity to connect with your students. If you are going to be lecturing to a camera anyway, it is far better to pre-record your lecture. You can share the recording through a website, or your organizations learning management system. Students can watch it at their convenience. They can pause it. They can rewind it. The can revisit it as often as they need. This frees up your live time to actually interact with your students, to get them working on collaborative activities, and to provide them with encouragement and troubleshooting support. Easy Lecture Capture StrategiesAlready have PowerPoint presentations ready for your F2F classes? Great! PowerPoint has built in features that will let you record your presentation, and share it as a video file. Refer to my video Turning PPT Presentations into Videos (Power, 2015) to learn how to do this.  Personally, I now prefer to use Screencast-O-Matic. There is a free version available, and it is fairly easy to learn how to use. Want to learn more about how to get started using Screencast-O-Matic? Check out this Screencast-O-Matic Tutorial by Technology for Teachers and Students. If at all possible -- avoid posting lengthy "lecture" or tutorial videos. Nobody wants to watch a talking head for an hour, and your students won't retain the key points anyway! It is perfectly okay to record your lecture all in one go... but leave a pause for a few seconds in between your major points. That way, you can "chop up" the video file into several smaller videos. A good length for an instructional video is no more than 5-10 minutes. It's better for streaming bandwidth, and it's easier for students to watch short videos at their convenience, and digest the key points. It also makes it easier for you to reuse individual videos in multiple courses, or as refreshers later in the course. Use YouTube Your institution cannot handle the bandwidth needed to stream all of the recorded lectures and live virtual classes that we're going to be asked to facilitate -- and it may not even realize that yet! Handling recorded or live video streaming requires specialized servers, with a lot of bandwidth. But, there's no need to panic! Just use YouTube. YouTube specializes in this, and their servers are optimized for mass distribution and streaming. Upload your recorded lecture presentations to YouTube, get the link for your video, and share that with your students. Don't want to make your recordings visible publicly? Set the video you have uploaded to "unlisted." That will block it from search engines, but still allow anyone with the direct link to watch it. Do not set it to "Private." Refer to my post on Using YouTube to Share Video in an Online Course (Power, 2019) for more on this. Setting Up Channels of Communication Just because we're practising social distancing in the midst of a pandemic doesn't mean our students need to experience social isolation from either us, or their cohort. You will likely have access to a learning management system for your course once it shifts online. There are tools built in that you can take advantage of, including discussion forums. I strongly recommend setting up three main types of discussion forums: Set up a News and Announcements forum. Put this right at the top of the course home page, so that students will see it as soon as they login to the course. Use this to post regular general announcements, important reminders, etc. I frequently also use it to post weekly wrap-ups, where I summarize what we've done in the previous week, and what we're going to look at in the upcoming week. Set up a Questions and Help forum. Put this right under the News and Announcements forum, if at all possible. I generally ask my students to use that forum for any and all questions related to the course content, assignments, or anything else that others in the class could benefit from knowing, and to refrain from sending me such questions by email. That achieves three things:
I tell my students to use email to connect with me if they have an urgent matter that cannot wait until the next time I login to the course (i.e., it can't wait until tomorrow), or if the issue is private or sensitive in nature. Set up Weekly/Topic discussion forums. Use these for discussions related to the actual course materials and activities for a given topic or week. Assignments. Set up some means for sharing assignment instructions, receiving assignment submissions, and distributing grades and feedback to your students. If you have access to a learning management system, it should have built-in assignment drop box tools. If not, simply set up a Google Drive folder for each assignment. Be sure to configure the link sharing settings so that students can actually save files into the folder. And be sure to specify a filenaming convention, so that you don't end up with a dozen or more students all submitting files named simply "Assignnment 1.doc." Want to open up a great communication channel with your assignment feedback? Now that you've gained some experience recording your lecture presentations, check out my recent post on Using Video to Provide Assignment Feedback (Power, 2020).
If you don't have access to an online space such as a learning management system through your institution, I highly recommend using the Canvas Free for Teachers platform. You can get up and running quickly, and enroll up to 250 students in a single course if needed. Refer to my recent post about Creating Your Own Courses Using Canvas for everything you need to get started. An Open Door In addition to your regularly scheduled virtual classroom sessions, it's a good idea to let your students know when and how they can connect with you live. I like to schedule "Open Office Hours" using an online platform. You can use your class' Adobe Connect or Zoom link for this... but if you don't have access to something like that, why not just use Google Hangouts? Set up a meeting room at the start of the term, share the link with your students, and schedule times when you will be logged into the space. I will login at the pre-scheduled times, and stay logged in for the whole hour (or however long the session is), even if none of my students show up. I can continue working on something else if they don't. If they do pop in during the hour, I can meet with them just the same as if they came to my physical office on campus. Sharing Course ResourcesIf your students already have physical textbooks, that's great. But, if they don't, you will need to provide them with some way to access the learning materials for a given topic. The easiest way to do that is to create a page in the learning management system (or on your website) for a given week or topic. Then, share links to the resources, with some introductory notes, and instructions on what to do with the resources. If any of the materials are copyright-protected, avoid posting actual copies of the materials. Instead, post the full bibliographical reference, a link to the site hosting the resources, and any instructions that students will need to access the materials. Oftentimes, this might simply be to remind students that they will need to login to their school library account to access the resources. Sharing Your Own MaterialsIf you have created your own videos, you can simply post the YouTube links for them. Some learning management systems and website platforms will let you easily "embed" the video right on the page. This might be a bit trickier if you've never done it before... but is a good idea if it can be done. The idea is to minimize the number of times that students need to navigate away from your course site, and then find their way back again! If you are going to upload your own "print" materials, refer to my recent video Two Basic Steps to Make Your Documents Digitally Accessible for tips on how to make sure your documents meet basic digital accessibility requirements. Don't Forget Accessibility Speaking of Digital Accessibility -- just because you're faced with a rapid online learning deployment doesn't mean that you can ignore local, regional, state/provincial, or national Accessibility requirements! I won't go into detail on that in this post. But, you can find some great resources to help you get started with understanding these requirements, and taking basic steps that anyone can do to meet them, from some of my recent posts: Helping Students Manage Their Time Students can become as overwhelmed in an online learning environment as you can, especially if it is their first time taking a course online. I frequently share the following post as a link (near the top of the course homepage) in my courses, to help students learn to manage their time with both course readings and discussions. Feel free to share it with your students! As I've already noted, the strategies covered in this post won't help you to create the perfect online learning experience. But, they will help you to get up and running quickly, while making the experience manageable for both you and your students (and avoiding a disasterous online learning experience). Rapid Transition Survival Guide Infographic Downloadable Versions:
ReferencesAdobe (n.d.). Adobe Connect. [Web page]. Available from https://www.adobe.com/products/adobeconnect.html
Blackboard, Inc. (2020). Blackboard Collaborate. [Web page]. Available from https://www.blackboard.com/teaching-learning/collaboration-web-conferencing/blackboard-collaborate Google (n.d.). Google Drive. [Web Page]. Available from https://www.google.com/drive/ Google (n.d.). Google Hangouts. [Web page]. Available from https://hangouts.google.com/ Google (2020). YouTube. [Web page]. Available from https://www.youtube.com/ Instructure (n.d.). Canvas: Free for Teacher. [Web page]. Available from https://canvas.instructure.com/login/canvas Power, R. (2015, January 25). Turning PowerPoint Presentations in Videos. [YouTube video}. Available from https://youtu.be/40uF8H2KgoY Power, R. (2018, June 12). Accessibility in Online Teaching and Learning. [Web log post]. Power Learning Solutions. Available from https://www.powerlearningsolutions.com/blog/accessibility-in-online-teaching-and-learning Power, R. (2019, January 13). Optimizing Your Time with Online Courses. [Web log post]. Power Learning Solutions. Available from https://www.powerlearningsolutions.com/blog/optimizing-your-time-with-online-courses Power, R. (2019, January 14). Using YouTube to Share Video in an Online Course. [Web log post]. Power Learning Solutions. Available from https://www.powerlearningsolutions.com/blog/using-youtube-to-share-video-in-an-online-course Power, R. (2020, February 13). Helping Everyone Access Your Online Learning Resources. [Web log post]. Power Learning Solutions. Available from https://www.powerlearningsolutions.com/blog/helping-everyone-access-your-online-learning-resources Power, R. (2020, February 12). Two Basic Steps to Make Your Documents Digitally Accessible. [YouTube video]. Available from https://youtu.be/AKzuXghQFnc Power, R. (2020, February 26). Creating Your Own Courses Using Canvas. [Web log post]. Power Learning Solutions. Available from https://www.powerlearningsolutions.com/blog/creating-your-own-courses-using-canvas Power, R. (2020, March 6). Using Video to Provide Assignment Feedback. [Web log post]. Power Learning Solutions. Available from https://www.powerlearningsolutions.com/blog/using-video-to-provide-assignment-feedback Power, R. (2020, March 6). Using Screencast-O-Matic to Provide Video Feedback. [YouTube video]. Available from https://youtu.be/Le_ek1aRjdw Screencast-O-Matic (2019). Video Creation for Everyone. [Web page]. Available from https://screencast-o-matic.com/ Slade, Tim (2017, February 26). 250+ Free Stock Photos for eLearning. [Web log post]. Timslade.com. Available from https://timslade.com/blog/stock-photos-for-elearning/ Technology for Teachers and Students (2016, December 26). Screencast-O-Matic Tutorial - FREE Screen Recording Tool. [YouTube video]. Available from https://youtu.be/s1jIPo1bWCo Zoom Video Communications (2020). About Zoom. [Web page]. Available from https://zoom.us/about I frequently use video to provide feedback on different types of assignments. For traditional research papers, I tend to provide text-based feedback, often as embedded comments. I find that makes it easier for students to refer back to when making revisions, or writing future papers. However, some assignments lend themselves to the more personalized touch that video provides -- and it is often easier to "show" rather than "tell" when providing feedback on web-based projects, video assignments, multimedia presentations, etc. In addition to the positive feedback that I've received from students who have received video feedback on their assignments from me, I also frequently get asked things like:
Using Screencast-O-Matic for Video Feedback My go-to tool for producing video feedback is a screen capture application called Screencast-O-Matic. I also use Screencast-O-Matic to produce tutorial videos for use in my blog posts or online courses. In the following video, I demonstrate how I use Screencast-O-Matic to produce feedback videos for a project-based assignment. Want to learn more about how to get started using Screencast-O-Matic? Check out this Screencast-O-Matic Tutorial by Technology for Teachers and Students. Benefits of Video FeedbackWest and Taylor (2015) showed that students overwhelming preferred narrated video feedback, noting that students found "that video feedback was clearer and less ambiguous than other forms of feedback and improved both the quality and quantity of the feedback received" (p. 400). They also noted that students found video feedback a great tool for increasing their sense of rapport with their tutors or instructors. Creating Engagement in the Classroom (n.d.) summarizes three key benefits to using video feedback:
Stannard (2018) provides an in-depth look at how the use of screencasting applications improves the way we give feedback to students. ReferencesCreating Engagement in the Classroom.org (n.d.) Student Engagement Using Video Feedback. [Web blog post]. Available from https://creatingengagementintheclassroom.org/student-engagement-using-video-feedback/
Power, R. (2020, March 6). Using Screencast-O-Matic to Provide Video Feedback. [YouTube video]. Available from https://youtu.be/Le_ek1aRjdw Screencast-O-Matic (2019). Screencast-O-Matic: Video Creation for Everyone. [Web page]. Available from https://screencast-o-matic.com/ Stannard, R. (2018, August 10). Using technology to improve the way we give feedback to students. [YouTube video]. Available from https://youtu.be/YMpcawBR5uk Technology for Teachers and Students (2016, December 26). Screencast-O-Matic Tutorial - FREE Screen Recording Tool. [YouTube video]. Available from https://youtu.be/s1jIPo1bWCo West, J., & Taylor, W. (2015). Enhancing the assessment experience: improving student perceptions, engagement and understanding using online video feedback. Innovations in Education and Teaching International, 53(4), 400-410. Available from https://doi.org/10.1080/14703297.2014.1003954 Update (May 21, 2020) - This post has been updated to include a new video on awarding digital badges in Canvas.  Some of the most fun instructional design courses that I have facilitated have been ones where participants actually design, develop, and pilot test their own online learning course modules. I like to use the Canvas Free for Teachers platform for these types of projects because it is a robust and easy-to-use LMS. I frequently use the platform to run some of my instructional design and educational technology-themed courses. I recently held a tutorial session for one such course, where I walked students through the steps of getting started with the building phase for their pilot projects using the Canvas learning management system. While running the live tutorial session (via the Adobe Connect web conferencing platform), I recorded my demonstrations. I then used Screencast-O-Matic to edit the footage, add closed captions, and produce a series of videos focusing on how to get up and running with your own courses in Canvas. This series of videos covers:
The Creating Courses in Canvas Playlist

Measure Twice, Cut Once... Architects prepare blueprints before contractors set about building houses or office towers. Engineers prepare schematics before technicians construct complex machinery. The same process holds in eLearning development. As Adeboye (2014) explains, without preparing a map of what an online module should look like, it’s easy to suffer from scope creep (the scope of the project continuously growing, because there are now criteria to indicate what needs to be done, and when it is done). It’s also possible for you, as a developer, to get lost and start feeling over your head. Adeboye also describes some of the key components that you should be including in a storyboard for an online teaching module. Gutierrez (2014) provides some more useful tips on how to get started in her article A Simple Guide to Creating Your First eLearning Storyboard. In the following video, I demonstrate how I use an Excel spreadsheet-based blueprint when I build online courses. In this example, I am using the storyboard for a course that I developed for Athabasca University using the Moodle learning management system. Penn State (2016) provides downloadable blueprint templates that you can use to design your own online course modules. Or, you could download my Sample Blueprint Template or Sample Excel Blueprint. Alternatively, you could create your own template, or use one from your own institution. More ResourcesThe following blog posts provide some additional resources that are helpful as you design and build your online learning resources. Some of these provide tips and tricks to maximize Digital Accessibility. Others focus on humanizing the online learning experience, helping students to optimize their time with course readings and discussions, and how to use YouTube effectively in your online courses. ReferencesAdeboye, D. (2014, Oct 21). Principles of Storyboarding for e-Learning design. [YouTube Video]. https://youtu.be/l9PZ2bEuKFA
Gutierrez, K. (2014, September 25). A Simple Guide to Creating Your First eLearning Storyboard [Web log post]. http://info.shiftelearning.com/blog/a-simple-guide-to-creating-your-first-elearning-storyboard Instructure (n.d.). Canvas: Free for Teacher. [Web page]. https://canvas.instructure.com/login/canvas Penn State. (2016). Course Blueprint and Audit Template. [Web page]. http://facdev.e-education.psu.edu/plan/audit Power, R. (2018, June 12). Accessibility in Online Teaching and Learning. [Web log post]. Power Learning Solutions. https://www.powerlearningsolutions.com/blog/accessibility-in-online-teaching-and-learning Power, R. (2019, January 13). Optimizing Your Time with Online Courses. [Web log post]. Power Learning Solutions. https://www.powerlearningsolutions.com/blog/optimizing-your-time-with-online-courses Power, R. (2019, January 14). Using YouTube to Share Video in an Online Course. [Web log post]. Power Learning Solutions. https://www.powerlearningsolutions.com/blog/using-youtube-to-share-video-in-an-online-course Power, R. (2019, January 22). Adding a Human Touch to Online Learning, Right From the Start! [Web log post]. Power Learning Solutions. https://www.powerlearningsolutions.com/blog/adding-a-human-touch-to-online-learning-right-from-the-start Power, R. (2019, February 17). Using Storyboards to Develop eLearning Courses. [YouTube video]. https://youtu.be/Ua4bWufBRgo Power, R. (2020, February 13). Helping Everyone Access Your Online Learning Resources. [Web log post]. Power Learning Solutions. https://www.powerlearningsolutions.com/blog/helping-everyone-access-your-online-learning-resources Power, R. (2020, February 26). Adding and Managing Canvas Course Participants. [YouTube video]. https://youtu.be/qXDQpPCRHzQ Power, R. (2020, February 26). Backing Up and Importing Canvas Course Content. [YouTube video]. https://youtu.be/dowQ5-0FB74 Power, R. (2020, February 26). Configuring Basic Canvas Course Settings. [YouTube video]. https://youtu.be/cCd-mjp0lmg Power, R. (2020, February 26). Creating a New Course in Canvas. [YouTube video]. https://youtu.be/CM9OeqID0Zs Power, R. (2020, February 26). Creating and Organizing Canvas Content Modules. [YouTube video]. https://youtu.be/2ljQ2AXCG7M Power, R. (2020, February 26). Creating Assignments in Canvas. [YouTube video]. https://youtu.be/CeRZ_9KO7uI Power, R. (2020, February 26). Creating Canvas Content Pages. [YouTube video]. https://youtu.be/UISNpTFSoDs Power, R. (2020, February 26). Embedding Web Content in Canvas. [YouTube video]. https://youtu.be/1arVnjuxta4 Power, R. (2020, February 26). Setting a Canvas Course Home Page. [YouTube video]. https://youtu.be/OZWOQY22p5k Power, R. (2020, February 26). Testing and Publishing Your Canvas Course. [YouTube video]. https://youtu.be/2jlZyfVmw0k Power, R. (2020, February 26). Working With Images in Canvas. [YouTube video]. https://youtu.be/26l4Dyj5jLU Power, R. (2020, March 12). Using a Quiz for Adaptive Release in Canvas. [YouTube video]. https://youtu.be/8zPsh2Jwwlo Power, R. (2020, May 21). Adding Digital Badges in Canvas Using Badgr. [YouTube video]. https://youtu.be/9FonuygaP60 Power, R. (2020, May 27). Differentiated Pathways with Badges in Canvas Courses. [YouTube video]. https://youtu.be/TWjLWKsJEPc Power, R. (2022, June 22). Using Quizzes to Create Differentiated Pathways in Canvas. [YouTube video]. https://youtu.be/zQqkNZ2v-Cg Publicdomainvectors.org (2020). Under construction road sign. [Image file]. https://publicdomainvectors.org/en/free-clipart/Under-construction-road-sign/80023.html Screencast-O-Matic (2019). Video Creation for Everyone. [Web page]. https://screencast-o-matic.com/ Slade, Tim (2017, February 26). 250+ Free Stock Photos for eLearning. [Web log post]. Timslade.com. https://timslade.com/blog/stock-photos-for-elearning/ |

AuthorRob Power, EdD, is an Assistant Professor of Education, an instructional developer, and educational technology, mLearning, and open, blended, and distributed learning specialist. Recent PostsCategories
All
Archives
February 2024
Older Posts from the xPat_Letters Blog
|
||||||||||||||||||||||||||||||||||||||||||||
- Home
- About
-
Publications
- Academic Publications
- Blog
-
Books
>
- The ALT Text
- Blended Langauge Learning: Evidence-Based Trends and Applications
- eLearning Essentials 2020
- Everyday ID
- Handbook of Mobile Teaching and Learning (2nd Edition)
- IAmLearning
- ID and Tech for Rapid Change
- ID and Tech Vol 2
- ID and Tech Vol 3
- Inclusive Peer Learning & Augmented Reality in Higher Education
- Mobile and ubiquitous learning: An international handbook
- Operating System Fundamentals
- Seamless Learning in Higher Education
- Seamless Learning in Higher Educaton vol 2
- Technology and the Curriculum: Summer 2018
- Technology and the Curriculum: Summer 2019
- Technology and the Curriculum: Summer 2022
- Technology and the Curriculum: Summer 2023
- Thriving Online: A Guide for Busy Educators
- Fiction
- Conference Presentations
- Power Learning Daily News
- Courses
- Research
- Resources


 RSS Feed
