I'm by no means an expert in all things digital accessibility -- but I am learning, because I think that it is vitally important that I do the things that are easy for me to do, which can have a huge impact for all of my potential learners and colleagues. To that end, this post looks at some of the things that I do already, and provides some useful tips and tricks to increase your compliance with basic digital accessibility standards. Making Documents More AccessibleOne of my graduate Education students recently asked for me for advice on how to make her dissertation document more digitally accessible, so I recorded a short video (2020, February 12) that highlights the two things that I find most commonly needed when writing papers, or creating instructional materials using a word processor like Microsoft Word:
I should point out -- as I do in the video -- that it is generally a bad idea to embed text within an image in a document (or on a web page). The text is not machine readable and, thus, will not be read by a digital screen reader application. That makes whatever text you have embedded within the image inaccessible to anyone who relies on a digital screen reader. It also creates difficulties reading the text on different screen sizes, as the text will not "reflow" or resize properly. Learning Technologies at College of DuPage (2018, July 3) has a good overview of additional tips for Creating Accessible Word Docs. They also have a wealth of additional resources on The Accessibility Cheat Sheet (2018, November 13) page. Making Web Content More Accessible I frequently create web-based content to either host learning resources, or to mediate the teaching and learning experience. Sometimes this content is hosted in a blog post (such as this one), on a public-facing web page, or on a content page within a learning management system (LMS). The three most common things that I find myself doing (and that I recommend to students when creating web-based content) are:
When it comes to properly "tagging" headings, I recommend sticking to the pre-formatting heading tags, which can be found on the toolbar at the top of the content editor. Just like with a Word document or PDF, anyone using a digital screen reader can easily navigate your page using their keyboard, or a digital switch, by "tabbing" through the pre-formatted headings. If you manually format your text, users won't be able to do this. (Sticking to the pre-formatted headings has an added advantage for you, because it allows site administrators to globally apply updates to organizational styles, including fonts, sizes, and colors, without you needing to update all of your previously created content!) eLearningBTC (2014) has an excellent video that demonstrates how to properly tag heading levels in the Canvas LMS. While the specific interfaces may look different for the various LMS platforms (such as Brightspace / D2L, Moodle, Blackboard, etc.), the concepts and principles are essentially the same in all of their content editor tools. Making Images AccessibleAgain, I advise against embedding a lot of text within images -- and that includes infographics. While infographics can do a great job of communicating concepts in a visually appealing way, they are just that -- visually appealing. The text they contain is not digitally accessible. If you are going to embed an infographic -- as with any images that you embed -- you should include ALT text that describes what the image portrays. You should also provide an alternate means of accessing the key points, such as listing or describing them in paragraph format either immediately before or after the embedded image. On the other hand -- sometimes you might embed an image that has no real content value. It is simply decorative (such as the accessibility icon at the top of this blog post). If users do not actually need to access the image to comprehend the content you are creating, many web authoring tools, and many LMSs, will allow you to check a box to "tag" the image as "decorative." If you do that, digital screen reader applications will skip the image altogether -- avoiding frustration for many users. I recently created a short video (2020, February 3) to show a group of my students how to add ALT text to their images when building a content page in the Canvas LMS. Color A simple rule of thumb for both documents and web-based content -- do NOT rely on color to tell the story (Comrade, 2015; Giessman, 2018). It seems counter-intuitive, but reliance on color to convey an important message can render your content inaccessible to a lot of users. In a similar vain, make sure that the colors you do use have a sufficient color contrast ratio. That means, it should be easy to distinguish your text against the color of the background. When in doubt, stick to reliable old black and white! You can use the The Paciello Group's (n.d.) free Color Contrast Analyzer tool to check your content for compliance with basic digital accessibility standards. Also, check out Interaction Design Foundation's (2018) Web Fonts are Critical to the Online User Experience - Don’t Hurt Your Reader’s Eyes. Adding Captions to VideosVideo is becoming an increasingly popular platform for sharing instructional content (or for student creation of assignment presentations). Video can be highly effective in this role. But, video is an audio-visual platform. Some users may not be able to hear your narration. Others may prefer to view the content with the volume turned off. For that reason, you should ensure that your videos contain closed captions. (Matheson, 2017) For my Two Basic Steps to Make Your Documents Digitally Accessible video, I taught myself how to use Screencast-O-Matic's (2019) new Captions feature to add closed captions. The following video (Screencast-O-Matic, 2018) shows how to do that yourself:  Now, you may not have access to video editing software such as Screencast-O-Matic. But chances are, if you are working with video content, you will be working with YouTube (Google, 2020) as a hosting platform. YouTube has built-in tools that allow you to automatically add closed captions, to upload your own captions, and to edit them online. VidIQ (2019) has an excellent quick overview of just how to do this: For more closed captioning resources, check out Described and Captioned Media Program's (2018) Caption It Yourself website. A Quick Workaround If you are not able to add closed captions when creating the video, one quick alternative is to prepare a document with the video's transcript, and post a link to a PDF of the transcript along with the video. It is not an ideal solution -- but for some, it is at least a basic means of providing a machine-readable way to access the content. Digital Accessibility Cheat SheetI was inspired to create this blog post when I was asked for some advice from one of my students, and then a colleague asked me if I had any good "cheat sheets" with basic Digital Accessibility tips for students or faculty. So... here is a Digital Accessibility Cheat Sheet that I put together summarizing some of the key points in this post. (Don't worry -- while this image-based version isn't really accessible, the downloadable PDF version is!) 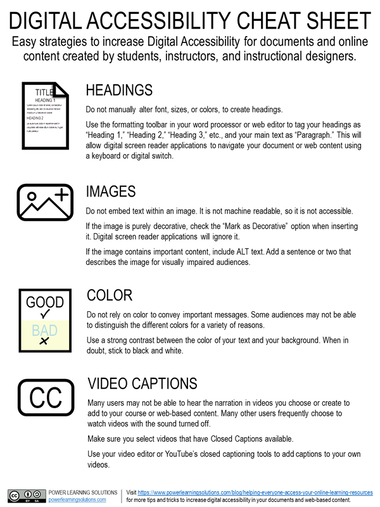
More Detailed Digital Accessibility Cheat SheetsMoritz Giessmann (2019) has posted an infographic-based cheat sheet for creating accessible web-based content (don't worry -- this infographic is HTML-based, not an image file, so it is accessible itself!).  You can find a whole lot more detailed cheat sheets and resources from the following sites:
The following sites have even more resources, including full digital accessibility toolkits: ReferencesComrade (2015). AA Compliance Cheat Sheet. [Web page]. Available from https://comrade.github.io/accessibility/cheatsheet.html
Coolidge, A., Doner, S., & Robertson, T. (2015). BCampus Open Education Accessibility Toolkit. [eBook]. Victoria, BC, Canada: BCampus. Available from https://opentextbc.ca/accessibilitytoolkit/ Council of Ontario Universities (2017a). Accessible Digital Documents & Websites. [Web page]. Accessible Campus. Available from http://www.accessiblecampus.ca/reference-library/accessible-digital-documents-websites/ Council of Ontario Universities (2017b). Accessibility in E-Learning. [Web page]. Accessible Campus. Available from http://www.accessiblecampus.ca/tools-resources/educators-tool-kit/course-planning/accessibility-in-e-learning/ Digital A11Y (2020). WCAG Cheat Sheets & Checklists. [Web page]. Available from https://www.digitala11y.com/wcag-cheat-sheets/ Described and Captioned Media Program (2018). Caption It Yourself. [Web page]. Available from https://dcmp.org/learn/213 eLearningBTC (2014, June 26). Canvas Tip #18: Using Heading tags to improve Accessibility. [YouTube video]. Available from https://youtu.be/EN6M_Ksthms Giessmann, M. (2019, October 18). Accessibility Cheat Sheet. [Web page]. Available from https://moritzgiessmann.de/accessibility-cheatsheet/ Google (2020). YouTube. [Web page]. Available from https://www.youtube.com/ Interaction Design Foundation (2018). Web Fonts are Critical to the Online User Experience - Don’t Hurt Your Reader’s Eyes. [Web page]. Available from https://www.interaction-design.org/literature/article/web-fonts-are-critical-to-the-online-user-experience-don-t-hurt-your-reader-s-eyes Learning Technologies (2018, November 13). The Accessibility Cheat Sheet. [Web page]. Learning Technologies at College of DuPage. Available from https://www.codlearningtech.org/2018/11/13/the-accessibility-cheat-sheet/ Learning Technologies (2018, July 3). Accessibility Series: Creating Accessible Word Docs. [Web page]. Learning Technologies at College of DuPage. Available from https://www.codlearningtech.org/2018/07/03/accessibility-series-creating-accessible-word-docs/ Matheson, G. (2017). 5 Reasons You Should Caption Your Videos. [Web blog post]. Access Innovation Media. Available from https://blog.ai-media.tv/blog/5-reasons-you-should-caption-your-videos The Paciello Group (n.d.). Colour Contrast Analyzer (CCA). [Web page]. Available from https://developer.paciellogroup.com/resources/contrastanalyser/ Power, R. (2018, June 12). Accessibility in Online Teaching and Learning. [Web log post]. Power Learning Solutions. Available from https://www.powerlearningsolutions.com/blog/accessibility-in-online-teaching-and-learning Power, R. (2020, February 3). Adding ALT text in Canvas. [YouTube video]. Available from https://youtu.be/5wAR9OMWK78 Power, R. (2020, February 12). Two Basic Steps to Make Your Documents Digitally Accessible. [YouTube video]. Available from https://youtu.be/AKzuXghQFnc Screencast-O-Matic (2018, July 19). Adding Captions on your Screencast-O-Matic Videos. [YouTube video]. Available from https://youtu.be/vMW4qrrFc0g Screencast-O-Matic (2019). Video Creation for Everyone. [Web page]. Available from https://screencast-o-matic.com/ Slade, Tim (2017, February 26). 250+ Free Stock Photos for eLearning. [Web log post]. Timslade.com. Available from https://timslade.com/blog/stock-photos-for-elearning/ VidIQ (2019, February 1). How to Add Subtitles to YouTube Videos [New Method]. [YouTube video]. Available from https://youtu.be/qfJthDvcZ08
2 Comments
Tips for Student Paper Writing and Managing Changes to APA Formatting
I've seen some recent Tweets showing excitement over some of the pending changes to formatting recommendations in the forthcoming APA Publication Manual version 7 (due for realease in October 2019). One thing that I'm pleased to see is more clarification on writing style to approach diversity and inclusion, as emphasized by Amy Diehl:
The recent hype over the APA Publication Manual version 7 reminded me that I had planned to do a blog post with some recommendations for student paper writing, based on some of the feedback that I find myself most commonly providing to my undergraduate and graduate-level Education students. I won't dwell too much on formatting specifics -- as I haven't seen the latest APA Publication Manual yet. But, I will provide some tips on writing style and formatting for stronger academic papers.
Writing Style
Three of the most common things that I point out in feedback on student papers relate to the use of a first-person perspective, the use of colloquialisms, and the use of subjective adjectives and adverbs. Here is the advice that I provide to my students (straight from the handy checklist of notes that I have ready when reviewing assignment submissions):
Common Formatting Issues
I have frequently commented on improper formatting of Running Headers in student paper submissions -- but it looks like I no longer need to worry about that. Running Headers will no longer be required for student papers in APA version 7. But, here is the list of some of the most common formatting comments that I have provided in feedback to my students:
Formatting for Digital Accessibility
Although I do not (at this point in time) deduct marks for this, I do like to point out to my students when they are not doing things to increase the digital accessibility of their papers. The easiest thing to do -- with the greatest impact for the widest possible audience -- is to use the formatting styles tools in your word processor. Too often I find that student manually format their paper titles, subtitles, and Level 1, 2, 3, etc., section headers. Doing this makes it impossible for anyone using a digital screen reader application to easily navigate your document. By formatting these elements using the formatting styles tools, you make two things possible:
This video shows how to use and modify the formatting styles in Word. A General Template
This template may not reflect all of the forthcoming changes -- but it should provide you with a good start on preparing an undergraduate or graduate paper following APA standards.
Click on the button below to download a general paper template for MS Word, reflecting some of the changes coming for APA version 7.
References
American Psychological Association (2019, August 6). Seventh Edition of APA's Best-Selling Publication Manual to Publish in October with a 700,000 First Printing. [Web page]. Available from https://www.apa.org/news/press/releases/2019/08/publication-manual
@amydeihl (2019, October 9). Use of singular "they" is no acceptable in APA style formatted papers [Tweet]. Retreived from https://twitter.com/amydiehl/status/1182135456479219712?s=19 GCFLearnFree.org (2016, February 8). Word: Applying and Modifying Styles. [YouTube video]. Available from https://youtu.be/w2lES-5Ynbk Slade, Tim (2017, January 17). 100+ Free Hero Images for eLearning. [Web log post]. Available from https://timslade.com/blog/hero-images-for-elearning/  Why do some superstitions and myths linger? Is it because they have some kernel of truth that will help guide us through an uncertain and increasingly complex world? Or is it because they sound like an easy-to-understand truth, that explains life's complexities in a way that makes it easy for us to justify otherwise irrational actions? Always influencing our decisions, yet threatening to undermine our intentions because of their inherent lack of scientific merit? In the case of the concept of Learning Styles, I fear it is the latter option. The spectre of "learning styles," and its proclaimed "importance" as a consideration in instructional design, continues to loom over education systems -- despite well-informed entreaties to abandon the myth in favor of evidence-informed decision-making. I recently asked a group of graduate-level education students to draft position papers on their personal teaching philosophies with respect to the integration of educational technology. We had spent the first few weeks of the course discussing the core competencies of Instructional Designers, and exploring a range of key learning theories. Not once in the course readings were Learning Styles included as a fundamental concept. Yet... the concept has popped up in Tweets using the course hashtag, and in a number of students' teaching philosophy statements. I don't normally discuss Learning Styles in my courses, because they are not only unproven -- they are disproven. Corporal punishment was once also considered acceptable in schools. But -- unlike corporal punishment -- the myth of Learning Styles remains so pervasive in schools, colleges, and universities, that I feel I would be remiss if I didn't address it in some way. If the brilliant and creative educators whom I have the privilege of collaborating with every day are being affected by this insidious myth, then I feel I should at least give them some "food for thought" -- some fuel for a healthy debate, rather than letting blind acceptance of something that has been "debunked" continue unchecked. I am not a neuroscientist, and there are plenty of reputable authors who have commented on this topic more eloquently than I could... so I will not pontificate. I will summarize a few key points, and point to some of these excellent resources that every instructional designer, practicing educator, and education student should take the time to read. What is the Learning Styles Myth?As Donald Clark (2016) noted, Learning Styles are distillations of myriad learning theories into "simple models... which are simplistic, easy to learn, easy to put on a training Powerpoint slide, and easy to explain." They distill complex learning theories into simple categories of how students "learn best," focusing on their preferred modes of receiving and interacting with learning content. Learning-styles-online.com (n.d.) list the following seven categories, with which I'm certain most educators are familiar:
What's Wrong with These Learning Styles?As Clark (2016) laments, "they are represented as researched, evidenced and science, when they are not." Clark has published a number of blog posts discussing the lack of science behind the Learning Styles myth and the reasons why it is still so (alarmingly) pervasive, which are well-worth reading:
Likewise, Steven Wheeler (2011) posted an excellent summary of what he called A Convenient Untruth. Some Key Points from Clark, Wheeler, and the many academic sources they cite (which include both neuroscientists and educational researchers):
The gist of a recent Tweet by one of my graduate education students (while sharing a link to an article from Forbes (McCue, 2019) espousing the importance of Learning Styles) was that incorporating them into instructional decision-making helps more students to achieve learning goals, because we'll hit more of their preferred "styles." Without getting into too much science -- targeting Learning Styles preferences should not be the focus. But, there is evidence-based merit to incorporate a variety of teaching and learning approaches. Such variety increases engagement, because it reduces the "normalization" of instructional presentation. In other words, it prevents desensitization to the presentation format. It also peaks learners' interest -- ALL learners, not just those who prefer one "style" over another. Boredom can take students out of the engagement zone talked about in Flow theory (Learning-theories.com, n.d.)! Then, there's also the benefit of multi-modal, or multi-channel reception of content (Mareno & Mayer, 2000; Quinette, et al., 2003; Zheng, 2009) . Evidence has shown that information presented through multiple modes -- targeting multiple senses -- is better understood, and better encoded into long-term memory. Long story short -- there are plenty of valid, rigorously tested learning theories and models that we should be considering when making instructional design decisions. There are plenty of reasons to incorporate variety in how we present material, and expect our students to interact with it. There is not only NO need to rely upon over-simplified models that sound good (but lack evidence) -- reliance on such models leads us astray from informed decision-making (and potentially risks us making harmful instructional decisions). ReferencesClark, D. (2010, February 15). Learning Styles - final nail in coffin? [Web log post]. Donald Clark: Plan B. Available from http://donaldclarkplanb.blogspot.com/2010/02/learning-styles-final-nail-in-coffin.html
Clark, D. (2016, October 8). 7 reasons why teachers believe, wrongly, in ‘Learning Styles.' [Web log post]. Donald Clark: Plan B. Available from http://donaldclarkplanb.blogspot.com/2016/10/7-reasons-why-teachers-believe-wrongly.html Clark, D. (2018, June 16). University faculty believe in Learning Styles and promote it to students while their Teacher Training departments say it's a myth. [Web log post]. Donald Clark: Plan B. Available from http://donaldclarkplanb.blogspot.com/2018/06/university-faculty-believe-in-learning.html ClipartXtras (n.d.). Chalkboard. [Image file]. Available from https://clipartxtras.com/categories/view/de245518959d7fb4318c464ae3016506010232ea/chalkboard-clipart-transparent.html Kisspng (2019). Chalkboard eraser. [Image file]. Available from https://www.kisspng.com/png-chalkboard-eraser-blackboard-sidewalk-chalk-2228618/download-png.html Learning Styles Online (n.d.) Overview of Learning Styles. [Web page]. Available from https://www.learning-styles-online.com/overview/ Learning-theories.com (n.d.) Flow (Csíkszentmihályi). [Web page]. Available from https://www.learning-theories.com/flow-csikszentmihalyi.html Mareno, R. & Mayer, R. E. (2000). A learner-centered approach to multimedia explanations: Deriving Instructional Design principles from Cognitive Theory. Interactive Multimedia Electronic Journal of Computer-Enhanced Learning, 2(2). http://imej.wfu.edu/articles/2000/2/05/index.asp McCue, T.J. (2019, January 30). How Combined Learning Style Not Just Visual Or Kinesthetic Can Help You Succeed. [Web log post]. Forbes. Available from https://www.forbes.com/sites/tjmccue/2019/01/30/how-combined-learning-style-not-just-visual-or-kinesthetic-can-help-you-succeed/#5f329857d9cc PlusPNG (2019). Regular Zombie. [image file]. Available from http://pluspng.com/png-7866.html Quinette, P., Guillery, B., Desgranges, B., de la Sayette, V., Viader, F., & Eustache, F. (2003). Working memory and executive functions in transient global amnesia. Brain 126(9), 1917-1934. Available from https://doi.org/10.1093/brain/awg201 Wheeler, S. (2011, November 24). A convenient untruth. [Web log post]. Learning with 'e's. Available from http://www.steve-wheeler.co.uk/2011/11/convenient-untruth.html Zheng, R. Z. (2009). Cognitive effects of multimedia learning. [PDF file]. Hershey, PA: Information Science Reference. http://www.sci.sdsu.edu/CRMSE/personal_pages/sreed/Manipulating_Materials.pdf  I teach a number of courses that focus on different aspects of instructional design for online learning. One thing that I always like to emphasize is the importance of "humanizing" the online learning experience. Too often, students (and instructors) complain about the loneliness and isolation of being in an online course. If it feels that way, then the principles of creating a Community of Inquiry have not been considered during the instructional design process! The Community of Inquiry framework (Athabasca University, 2016; Garrison, Anderson & Archer, 2001) tells us that we need to facilitate three key "presences" in order to set up an effective online learning experience:
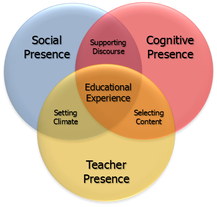 The Community of Inquiry Framework (Adapted from Athabasca University, 2016) Even before we enroll students into our online courses, we need to put careful thought into how we are going to foster these presences (and how they will interact with each other). This is part of the "Teacher Presence" aspect. Another important part of the Teacher Presence aspect is just actually letting your students know that you are there, and helping them get to know you as a person. As Pacansky-Brock (2015) explains, this is the "Secret Sauce" to help your students feel welcomed! One activity that I have engaged some of my instructional design students in aims to maximize Teacher Presence from the very first moments that students enter into an online course. Greet Them at the Door!First impressions are as important when teaching online as they are in a face-to-face classroom. Unfortunately, online teachers don’t usually have the opportunity to physically greet their students at the door. But that doesn’t mean you can’t introduce yourself, and personally welcome your students to your course. Creating an online Instructor Introduction or Course Welcome video is a great way to establish teacher presence, and inspire and motivate your students from the moment they first login to your online course. Dwayne Reed’s Welcome to the 4th Grade (2016) is an excellent example of an Instructor Introduction video that has become an online sensation. Now -- we can't all create something as elaborate (and catchy!) as Reed's musical intro. But that doesn't mean we can't add the same sort of personal touch. For a more practical (and easy-to-create) example, check out the Instructor Welcome Video that I created to add into my online courses. Tips to Get the Most Out of Your Instructor Welcome VideoOne of the most important tips that I can give is to avoid talking about the course itself. You wouldn't start talking about the details of your course if you were physically greeting students at the door on the first day of a face-to-face class. Neither should you when greeting them at the start of an online course! Save that for a second, course specific video. Avoiding course specifics in your Instructor Welcome Video has an added practical benefit for you -- it increases your Return on Investment for the time spent on creating your video. If the video is a personal greeting, and not about a specific course, then you can use it in more than one online course! And, that brings me to my second big tip -- try to avoid saying things in your video that will immediately or quickly date it. Avoid saying things like "I'm currently pursuing...." Instead, say something like "In 201x I began...." That way, you don't need to redo your video as soon as things change (which means you also don't need to hunt down every place you've shared the video, and update the link to the new version). I used the free version of PowToon to create my Instructor Welcome video. But, there are plenty of other free video creation applications that you could use (and some awesome paid ones, as well). Additional ResourcesHere are just a handful of additional resources that you might find helpful:
ReferencesAthabasca University (2016). The Community of Inquiry [Web page]. Available from https://coi.athabascau.ca/
Byrne, R. (2017, February 6). How to Make Your YouTube Videos Interactive [Web log Post]. Free Technology for Teachers. Available from http://www.freetech4teachers.com/2017/02/how-to-make-your-youtube-videos.html#.WJodp2IrKUk Garrison, D. R., Anderson, T., & Archer, W. (2000). Critical inquiry in a text-based environment: Computer conferencing in higher education model. The Internet and Higher Education, 2(2-3), 87-105. Available from http://cde.athabascau.ca/coi_site/documents/Garrison_Anderson_Archer_Critical_Inquiry_model.pdf Michael, A. (2017, February 5). 6 Steps For Making An Engaging eLearning Promo Video For Your Course [Web log Post]. eLearning Industry. Available from https://elearningindustry.com/6-steps-making-engaging-elearning-promo-video-course Pacansky-Brock, M. (2015, June 2). Instructor Presence: The Secret Sauce. [YouTube video]. Available from https://youtu.be/P8S1aOA8HkE Power, R. (2019, November 9). Hi There! Meet Rob Power. [YouTube video]. Available from https://youtu.be/ff-6GtdX9xM PowToon (2017). Available from https://www.powtoon.com/ Reed, D. (2016, August 20). Welcome to the 4th Grade. [YouTube video]. Available from https://youtu.be/XBLcuGunRxU Slade, Tim (2017, January 17). 100+ Free Hero Images for eLearning. [Web log post]. Available from https://timslade.com/blog/hero-images-for-elearning/ Update (April 17, 2020) -- this post has been updated with a new video demonstrating how to create your own YouTube channel for sharing instructional videos with your students.  I recently had a question which reminded me... I should never assume that everyone already knows how to use YouTube! I like YouTube as a EdTech tool, because it is a powerful way to share video content with your students (why bother worrying about how to process and stream video content, when YouTube already has powerful servers that will do it for you!). And that doesn't mean that you have to direct them to YouTube to view it. You can embed your YouTube videos directly into a website, or an LMS content page. Adding Video to YouTubeTo that end, here are a few resources that might be helpful. This first video shows the basics of how to upload and share videos in YouTube. As noted in the video... you do need to login. All you need for that is a GMail / Google account! Choosing a Privacy SettingThis next video goes over some of the basics of choosing a privacy setting for your video. It's important to choose the right setting. If you want your video to be available publicly, then choose "Public." If you want to share your video with your students, and embed it into a webpage or LMS page, choose "Unlisted." "Unlisted" means the video can't be found using a search engine, but anyone with the link can still view it without a password. If you don't want anyone to view it without you directly allowing "just that person" to see it, choose "Private." Even with a direct URL, no one will be able to watch the video unless you authorize their email address! Embedding Video in Your LMSFinally... here are some quick tutorial videos showing the basics of how to embed a YouTube video (whether it's one you uploaded, or another video that you found on YouTube) into pages in some of the LMS platforms that I have worked with most frequently:
Copyright NoteOne of the great things about embedding a YouTube video into a webpage or course page in an LMS is that you won't be violating the video owner's copyright (assuming the person who posted the video isn't violating a copyright within the video itself!). That's because you're not actually making a copy of the video. You're essentially just sharing a link to it, and if the owner decides they don't want anyone to use it anymore, they can remove the video, or change the privacy setting. When they do that, your embedded player simply won't show it any more! Choosing a Copyright Licence When Posting Your Video to YouTubeYouTube has a few different "licencing" options when you post your own videos. The default is "Standard YouTube Licence," which is essentially a copyright licence. I prefer to change that setting to a Creative Commons Attribution. Using a CC Attribution means that you are letting others reuse your video as an Open Access resource, so long as they properly attribute you. It also means that you are allowing others to make a copy, edit, remix, or combine parts of your video with other Creative Commons videos from YouTube! Creating Your Own YouTube ChannelIf you have a Google or GMail account, then you already have a YouTube account. In this video, I demonstrate the basic steps to setting up your own YouTube channel for sharing instructional videos with your students. Time Limits on YouTube Videos By default, new YouTube accounts have a time limit of 15 minutes for each video upload. To increase this, you will need to "verify" your account with Google. Instructions on how to do this can be found HERE. ReferencesEves, D. (2014, January 2). How to Properly Upload Videos to YouTube. [YouTube video]. Available from https://youtu.be/Hlxqk0iHp5w
Gniffke, D. (2016, May 11). Canvas - Embedding Video. [YouTube video]. Available from https://youtu.be/l2ebbdJPy0o Google (2020). Upload videos longer than 15 minutes. [Web page]. YouTube Help. Available from https://support.google.com/youtube/answer/71673?co=GENIE.Platform%3DDesktop&hl=en&oco=0 Interesting Videos (2017, February 2). Creative Commons License YouTube cc Not Standard Youtube License. [YouTube video]. Available from https://youtu.be/e-46x3mpS8M Power, R. (2015, January 25). Embedding Videos in D2L. [YouTube video]. Available from https://youtu.be/QZ4558qvzhw Power, R. (2020, April 17). Creating a YouTube Channel for Educators. [YouTube video]. Available from https://youtu.be/Uy_5gOV80LY Scott Gardiner Technical Services (2016, May 2). How to Embed a YouTube Video on Your Weebly Website. [YouTube video]. Available from https://youtu.be/4PfKoV9XyN0 Straub, S. (2018, February 17). How To Embed Media Such As Youtube Videos Into Blackboard. [YouTube video]. Available from https://youtu.be/BWIF_d2Vcc4 Tattershall, E. (2017, June 6). Embedding Video in Your Moodle Course. [YouTube video]. Available from https://youtu.be/K4zAZuHGNrM thebasicgist (2013, June 6). Youtube Settings: Unlisted v Private v Public. [YouTube video]. Available from https://youtu.be/fViYcDDZyhk University of Leicester Learning and Teaching (2016, February 29). Embed a YouTube video in Blackboard. [YouTube video]. Available from https://youtu.be/ES-CZtBdHOI I frequently share this advice to my students at the start of a new course (in some form or another, and often in separate communications). Since we're at the start of another term, I figured that this would be a good time to share some useful time management strategies for anyone participating in an online course. Optimizing Your Time with Course Readings There are often a lot of readings included in your course units. But, that doesn’t mean you need to spend all of your time reading, reading, reading…. Your instructor may share a lot of resources in your course to give you a broad perspective on the types of resources out there, and issues to consider. You don’t need to read and digest EVERY. SINGLE. WORD. Take a look at each of the resources, and try to pull the main points out of them – particularly as they apply to you and your own context! This short video by Thomas Frank contains some great nuggets on how to speed up your overall reading, and get the most out of reading for learning. In particular:
Optimizing Your Time with Course DiscussionsI recently responded to a student who shared the following comment in the Questions and Help forum in one of my courses:
Here are some of the strategies that I suggested: First strategy... you don't need to read each and every post!
Second strategy... set up a "Daily Forum Digest."
Third Strategy... set aside a specific time when you will review messages.
Fourth Strategy... if your instructor has a dedicated Questions and Help forum, use it!
I hope this advice helps! ReferencesFrank, T. (2015, October 2). 5 Ways to Read Faster That ACTUALLY Work - College Info Geek. [YouTube video]. Available from https://youtu.be/kmDMrxUSXKY
Slade, Tim (2017, January 17). 100+ Free Hero Images for eLearning. [Web log post]. Available from https://timslade.com/blog/hero-images-for-elearning/ What is Instructional Design?On the surface, this question sounds like it should have a straightforward answer. But, often the definition of instructional design can be murky, because there is a lot that it encompasses. Right now, I am facilitating a couple of introductory-level instructional design courses at different Canadian universities. I thought that it might be helpful to draw upon some of their course resources to summarize what instructional design is, from my perspective. In one of my courses, participants are asked to review a blog post by Tom Kulhmann (2008). Kulhmann's post What Everbody Ought to Know About Instructional Design provides a video example, and discusses it's instructional design elements. Along the way, he injects five key bullet points about what instructional design is:
For the most part, I agree with Kulhmann's observations -- although I would argue that "compresses the learning process and saves time" is not always a desired objective of the ID process. That would all depend on the context -- and in some contexts, you may want to deliberately extend the learning process! However, I think that there are enough "gems" in Kulhmann's points to craft a basic working definition of instructional design for the purposes of those "new to the game." Instructional design is the process of establishing clear learning goals, and then creating a plan, environment, and resources, that engages learners with meaningful content and clear and purposeful activities. Yes, there is a lot more to instructional design than what this definition would imply! I'm deliberately keeping things succinct for the purposes of this post. But, perhaps a look at what instructional designers do might give a better sense of the scope of the field... What is the Role of the Instructional Designer?The precise roles and tasks of an instructional designer may vary, depending on their school or organization. I've created the following infographic to illustrate the breadth of the roles that I've played as an instructional designer and instructional developer. These roles include:
And, of course, there is a lot of overlap between all of these roles! 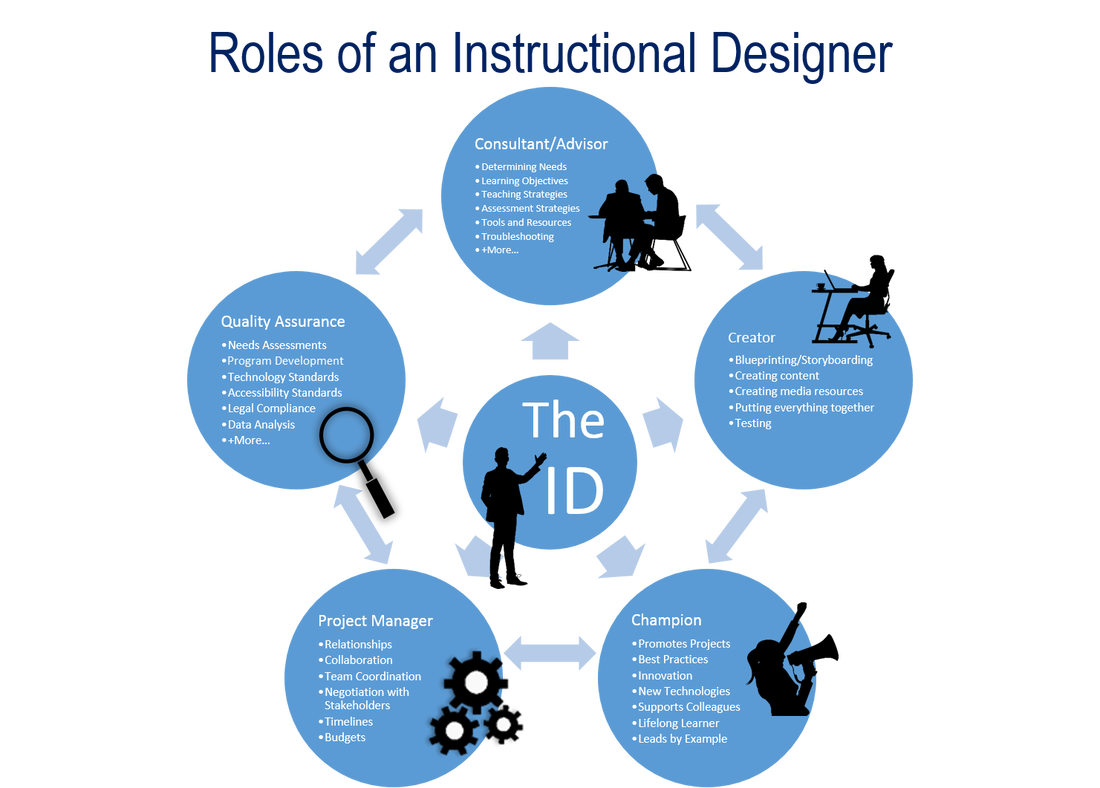 References:
Kulhmann, J. (2008, July 22). What Everybody Ought to Know About Instructional Design. [Web log post]. Rapid eLearning. Available from https://blogs.articulate.com/rapid-elearning/what-everybody-ought-to-know-about-instructional-design/
I've been playing around a bit with using HP Reveal Studio (formerly Aurasma Studio) to created Augmented Reality resources, such as interactive game boards and conference posters. For Mobile Summit 2018 and the 17th World Conference on Mobile and Contextual Learning (mLearn 2018), I developed a workshop on how to use HP Reveal Studio to create an AR treasARmap. That's a magic treasure map that appears blank for my students, until they scan it using the HP Reveal (formerly Aurasma) app using their mobile devices. What they see when they scan the blank map is something like the image below, where the pieces of the map slowly reveal themselves.

The QR code and URL on the image above will take you to the companion resources that I created for the workshops. But, since I've had a lot of requests for this, I've put together this blog post to bring everything together into one spot, and show how I created the AR treasARmap.
About treasARmap
The treasARmap map was created using the Canva free online poster and infographic creation suite. It was then "augmented" using a free HP Reveal Studio account. This is what the final product looks like:

Accessing the Hidden Treasure Map

To access this augmented reality "treasARmap," install the HP Reveal (formerly Aurasma) AR app on your mobile device. Launch the app, point your device at the image below, and click on the AR objects to follow a team's path to the finish line!
Get the App
Follow Rob Power, EdD on HP Reveal
Step 1: Making a treasARmap Poster
Do It Yourself
Additional Useful Tutorials
Step 2: Augmenting Your treasARmap
Do It Yourself
Additional Useful Tutorials
Share Your treasARmap
I'd love to see what you come up with playing around with the concept of creating AR treasARmaps, or other AR resources for your teaching and learning! I've set up the following Padlet wall as a spot where participants in the treasARhunt workshops can share their completed projects... but feel free to post yours, as well. (Just be sure to include a note as to "who" we need to follow using the HP Reveal app to bring your treasARmap to life!)
 The benefits and drawbacks of the integration of technology into both the curriculum, and teaching and learning practice, continue to be contentious issues on multiple fronts. On the one hand, there are those who continue to subscribe to Clark’s (1994 a, b) contention that technology has no impact whatsoever on learning achievement. Evidence may point to this conclusion that technology integration results in no significant difference in learning achievement compared to “traditional” classroom settings. However, there are many more reasons why it is imperative that teachers and schools thoughtfully plan for meaningful technology integration. Clark’s long-time rival in the media effectiveness debate, Kozma (1994 a, b), points to the fact that newer technologies enable pedagogical approaches and learning experiences that previously were not possible (and for which there can be no technology-free learning achievement comparison). These learning opportunities include the ability for remote learners, and those facing accessibility challenges, to be engaged on unprecedented levels. Another imperative for meaningful technology integration is the preparation of learners to be responsible digital citizens, who are empowered to leverage technology to meet emerging needs in their lives, learning, work, and society. About the eBook Technology and the Curriculum: Summer 2018 has been written by participants in EDUC 5303G, a course in the Masters of Education program at the University of Ontario Institute of Technology. The mandate of EDUC 5303G is to [examine] the theoretical foundations and practical questions concerning the educational use of technology. The main areas of focus… include learning theory and the use of technology, analysis of the learner, curriculum, and technology tools, leading-edge technology programs/initiatives, implementation, assessment, and barriers toward using technology. The overall focus of the course is on developing a critical, evidence-based, theoretically grounded perspective regarding the use of technology in the curriculum (EDUC 5303G Course Syllabus, Spring/Summer 2018). Each chapter in the eBook focuses was written by a course participant, and focuses on a topic chosen by them that stems from the issues explored throughout the Spring/Summer 2018 term. The authors first submitted their chapter drafts for feedback from the instructor. Each chapter also underwent a double-blind peer-review process, before the final versions were added to the actual eBook in Pressbooks. Why an Open Access eBook EDUC 5303G aims to live up to its own mandate, and meaningfully integrate technology into the course curriculum, and overall learning experience. Digital communications tools, such as the Pressbooks platform, allow for a transformation of the traditional academic paper writing experience. Rather than writing a paper to demonstrate topic understanding, and competence with writing mechanics, for just an instructor’s review, technology enables course participants to write with purpose. This eBook chapter writing endeavour allows participants in a course like EDUC 5303G to more fully engage with their peers in the writing process, in a manner that reflects the realities of academic writing beyond the classroom. The project also allows them to share their work with a global audience. This integration of technology forces students to take deeper ownership of their work, but also allows them to share the fruits of their labours with others who could benefit from their explorations of topics related to the meaningful use of technology in education. It gives me great pleasure to facilitate access to the tools and processes used by provide the EDUC 5303G Spring/Summer 2018 participants to produce the eBook, and to share the resources they have compiled. ReferencesClark, R.E. (1994a). Media will never influence learning. Educational Technology Research and Development, 42(2), pp. 21-30.
Clark, R.E. (1994b). Media and method. Educational Technology Research and Development, 42(3), 7-10. Kozma, R. (1994a). Will media influence learning? Reframing the debate. Educational Technology Research and Development, 42(2), pp. 7 - 19. Kozma, R. (1994b). A reply: Media and methods. (1994). Educational Technology Research and Development, 42(3), pp. 11 - 14. Power, R. (Ed). (2018). Technology and the Curriculum: Summer 2018. [eBook]. Surrey, BC, Canada: Power Learning Solutions. Available from https://techandcurriculum.pressbooks.com/ What are the challenges that we face as technology integration specialists in our teaching and learning contexts? And, what tips or advice do you have for overcoming some of those hurdles? Those are questions that I just posed to graduate education students participating in my Spring/Summer 2018 section of EDUC5303G: Technology and the Curriculum. From my experience (and from my chapter in Yu, Ally and Tsanikos (2018) and my keynote presentation at Mobile Summit 2018)... One of the biggest hurdles that we seem to face is getting past shifting into the "Early Adopters" or very early "Early Majority" phases of the Diffusion of Innovation model (Rogers, 1974): 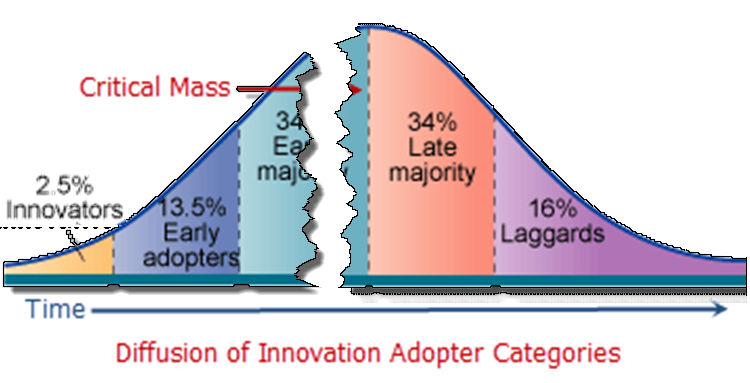 If we look at the Technology Acceptance Model (TAM) (Davis, 1989), I don't think that the problem with intention (and action) to integrate technology lies with "Perceptions of Usefulness." We see examples every day of how useful different technologies can be. 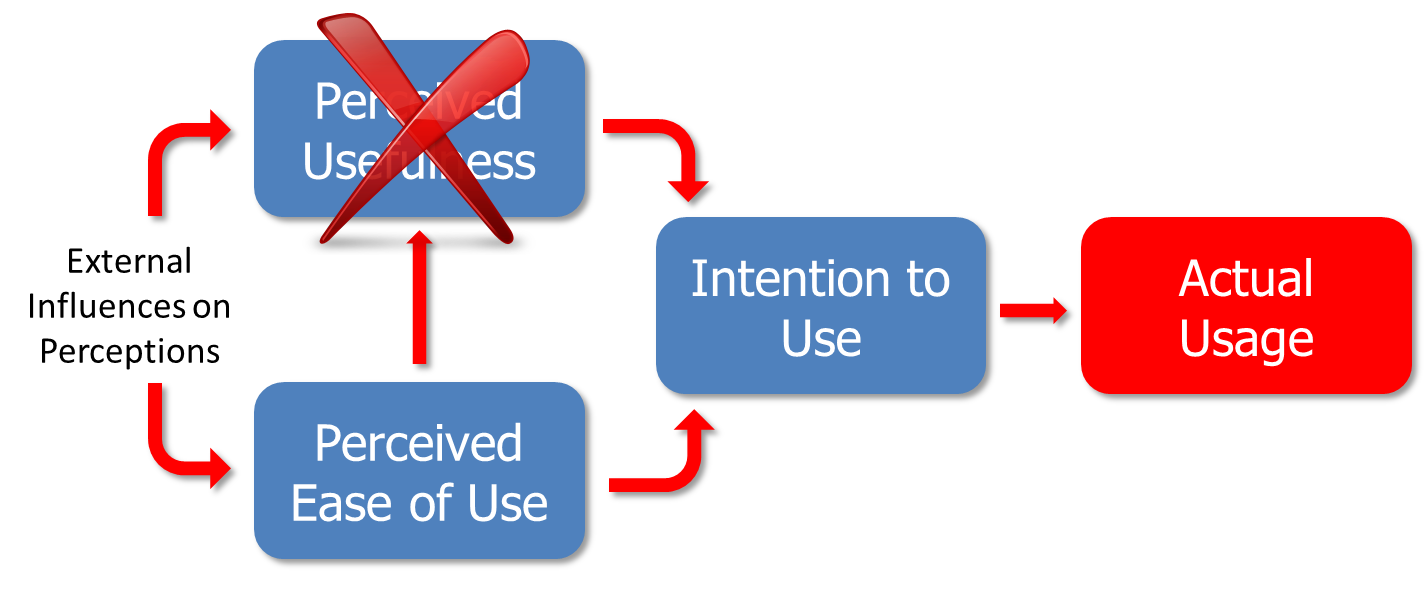 Digital technologies can do just about anything that we can dream up for them to do... and examples of innovative EdTech use abound. It's easy to find them, and it's easy to share them. (That doesn't mean we should slack off on our efforts in this area... ideas and inspiration are still of vital importance.) So... if the problem is not with "Perceptions of Usefulness" in TAM, it must be with "Perceived Ease of Use." It's pretty reasonable to understand the causes of this problem. Ally and Tsinakos (2014) lament that our teacher preparation programs are largely still preparing teachers to function in a system that hasn't really existed since the 1980s. Finger, Jamieson-Proctor and Albion have similarly lamented that changes in digital technologies that could benefit the curriculum: "have not always translated into practice which has resulted in a focus on the need for improvements in pre-service teacher education programs and professional development of practising teachers” (2010, p. 114) The Self-Confidence ProblemThe biggest problem we face in getting teachers to integrate technology into their practice isn't that they don't see it as useful... it's that they don't feel comfortable using it. They lack a strong perception of self-efficacy. As Tschannen-Moran and Woolfolk Hoy (2001) note: Perceptions of self-efficacy can influence a teacher’s “levels of planning and organization” and “willingness to experiment with new methods to meet the needs… of students” (p. 783).  If we can help teachers to feel more comfortable with using technology, and they already see that technology as being potentially useful, they'll be more likely to experiment with it in their teaching and learning practice. So... how do we get there? Filling the Gaps in TPACKIn my Handbook chapter, and Mobile Summit 2018 Keynote, I focused in on how widespread TPACK (Koehler & Mishra, 2006, 2008; TPACK.org, 2012) has become in guiding teacher professional development when it comes to technology integration. As teachers, we already have strengths in the areas of Content Knowledge and Pedagogical Knowledge. It's easy for us to demonstrate the usefulness of different technologies, and to find training or resources on the technical how-to of technologies that we do choose to integrate (assuming that we can find the time to pursue them!). So we've got those aspects of TPACK covered off pretty well. And, if we're using TPACK to help shape professional development based on our needs as teachers, then we don't need to focus so much on addressing those areas. But, what TPACK shows us we're still missing, and fails in-and-of-itself to deliver, is the actual Technical-Pedagogical Knowledge area. Without this understanding of pedagogical decision-making for the use of technology, how are teachers going to increase their confidence in their ability to use technology effectively? 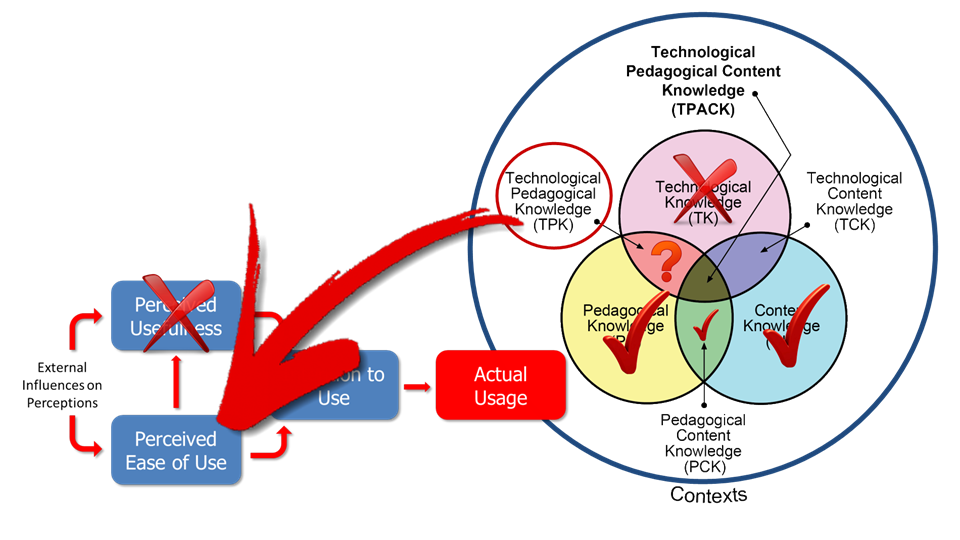 Focusing on Good PedagogyAs I've already noted, teachers are pedagogical professionals. If we want to increase their self-efficacy when it comes to meaningfully and effectively integrating technology into their practice, we don't need to focus on either the usefulness of the technology, or how to use specific tech tools or "apps du-jour." What we need to focus on is how to make pedagogical decisions first, decide when tools are needed, and then find appropriate tools to "get the job done." In my research, I've demonstrated exactly what Tschannen-Moran and Woolfolk Hoy (2001) were talking about. When provided with tools to support pedagogical decisions around the use of technology, teachers became both more interested in, and more willing to experiment with technologies they hadn't used before. In my research, I focused on the use of mobile learning strategies, and I provided teachers with professional development that focused on making instructional design decisions using an evidence-driven framework. They did get to the "fun" bit of playing with the tech itself (I mean, how boring would PD be if we never got a chance to play with the toys!) -- but I carefully minimized the cognitive load of learning new technologies, so that the teachers could focus on the technology integration decisions that they were making.  The Key Takeaway: Purpose and PedagogyWhat's the point of my rant in this blog post? While we should keep up with experimenting with innovative technology use in education, our main concern should not be with either what the technology can possibly do, or how to use that technology. The focus should be on how to use the technology meaningfully. To get there, we need to place sufficient focus in teacher preparation programs and professional development efforts on how to make decisions about when it's appropriate to use technology tools, and how to frame our instructional design decisions. If teachers feel confident as to why they are using tools, and in the fact that it's not so important that they be experts with all of the tools themselves (after all -- our students can oftentimes provide us with on-the-spot tech support!), then their self-efficacy will go up. That will get more teachers to the "Intention to Use" stage in TAM, which will bring us closer to the Late Majority stage in the Diffusiion of Innovation model. You can find my full slidedeck from my Mobile Summit 2018 keynote presentation HERE. You can learn more about my research into the CSAM framework HERE, and the mTSES tool that I used to measure changes in teachers' perceptions of self-efficacy with mobile learning HERE. ReferencesAlly, M., & Tsinakos, A. (2014). Increasing access through mobile learning. Edmonton, AB, Canada: Athabasca University Press and the Commonwealth of Learning. Retrieved from http://www.col.org/resources/publications/Pages/detail.aspx?PID=466
Davis, F. D. (1989). Perceived usefulness, perceived ease of use, and user acceptance of information technology. MIS Quarterly, 13(3), 319-340. doi:10.2307/249008 Finger, G., Jamieson-Proctor, R., Albion, P. (2010). Beyond pedagogical content knowledge: The importance of TPACK for informing preservice teacher education in Australia. In M. Turcanyis-Szabo & N. Reynolds (Eds.), Key competencies in the knowledge society (pp. 114-125). Berlin, Heidelberg: Springer. Koehler, M., & Mishra, P. (2006). Technological pedagogical content knowledge: A framework for teacher knowledge. Teachers College Record, 109(6), 1017-1054. Retrieved from http://punya.educ.msu.edu/publications/journal_articles/mishra-koehler-tcr2006.pdf Koehler, M., & Mishra, P. (2008). Introducing TPCK. In AACTE Committee on Innovation and Technology (Ed.), The handbook of technological pedagogical content knowledge (TPCK) for educators (pp. 3-29). American Association of Colleges of Teacher Education and Routledge, NY, New York. Power, R. (2018). The CSAM framework. [Web page]. Power Learning Solutions. Available from http://www.powerlearningsolutions.com/csam.html Power, R. (2018, May 16). Making mobile learning work for educators and students. Opening keynote address at Mobile Summit 2018, 16-17 May 2018, Scarborough, ON, Canada. Available from http://www.powerlearningsolutions.com/making-mobile-learning-work.html Power, R. (2018). The Mobile Teacher's Sense of Efficacy Scale (mTSES). [Web page]. Power Learning Solutions. Available from http://www.powerlearningsolutions.com/mtses.html Power, R. (2018). Supporting mobile instructional design with CSAM. In S. Yu, M. Ally, & A. Tsanikos (Eds.), Mobile and ubiquitous learning: An international handbook, pp. 193-209. Singapore: Springer Nature. DOI 10.1007/978-981-10-6144-8_12. Available at https://doi.org/10.1007/978-981-10-6144-8_12 Rogers, E. (1974). New product adoption and diffusion. Journal of Consumer Research, 2(4), 290–301. tpack.org (2012). The TPACK image. Retrieved from http://www.tpck.org/ Tschannen-Moran, M., & Woolfolk Hoy, A. (2001). Teacher efficacy: Capturing and elusive construct. Teaching and Teacher Education, 17(7), 783-805. |

AuthorRob Power, EdD, is an Assistant Professor of Education, an instructional developer, and educational technology, mLearning, and open, blended, and distributed learning specialist. Recent PostsCategories
All
Archives
February 2024
Older Posts from the xPat_Letters Blog
|
||||||||||||||||||||||||||||||||
- Home
-
About
-
Publications
- Academic Publications
- Blog
-
Books
>
- The ALT Text
- Blended Langauge Learning: Evidence-Based Trends and Applications
- eLearning Essentials 2020
- Everyday ID
- Handbook of Mobile Teaching and Learning (2nd Edition)
- IAmLearning
- ID and Tech for Rapid Change
- ID and Tech Vol 2
- ID and Tech Vol 3
- Inclusive Peer Learning & Augmented Reality in Higher Education
- Mobile and ubiquitous learning: An international handbook
- Operating System Fundamentals
- Seamless Learning in Higher Education
- Seamless Learning in Higher Educaton vol 2
- Technology and the Curriculum: Summer 2018
- Technology and the Curriculum: Summer 2019
- Technology and the Curriculum: Summer 2022
- Technology and the Curriculum: Summer 2023
- Thriving Online: A Guide for Busy Educators
- Fiction
- Conference Presentations
- Power Learning Daily News
- Courses
- Research
- Resources


 RSS Feed
